The Ultimate Guide to Baking Perfect Butter Cookies
There is something truly magical about the smell of fresh butter cookies wafting through the kitchen. These classic treats have been a staple in biscuit tins and holiday platters for generations. Most people love them because they are simple, yet they feel very fancy and indulgent. When you take that first bite, you get a delicate crunch followed by a rich flavor that literally melts on your tongue. In this guide, I will show you how to master this timeless recipe right in your own home. You do not need to be a professional chef to get these right every single time. We are going to focus on quality ingredients and easy steps that even a beginner can follow with total confidence.
Why We All Love Classic Butter Cookies
The main reason butter cookies are so popular is their incredible texture and deep, creamy flavor. Unlike a standard chocolate chip cookie, these are all about the purity of the butter itself. They are not overly sweet, which makes them the perfect partner for a hot cup of tea or coffee. I remember my grandmother always keeping a blue tin of these in her pantry, and the homemade version is even better. They are versatile enough for a birthday party, a wedding shower, or just a Tuesday afternoon snack. Because they hold their shape so well, they are also the best choice for using fancy cookie cutters or a piping bag.
Essential Ingredients for Success
To make the best butter cookies, you only need a handful of basic pantry items that you likely already have. The star of the show is, of course, high-quality unsalted butter. Since this provides almost all the flavor, try to use the best brand you can find. You will also need granulated sugar for sweetness and all-purpose flour to provide the structure. A pinch of salt and a splash of pure vanilla extract help to balance the richness and add a lovely aroma. Some people like to add a single egg yolk to make the dough richer, but a traditional shortbread-style version keeps it even simpler.
The Importance of Room Temperature Butter
One of the biggest secrets to a great butter cookies recipe is the temperature of your fats. You want your butter to be “room temperature,” which means it should be soft but not melting or oily. If it is too cold, it won’t cream properly with the sugar, and your cookies will be lumpy. If it is too soft, the dough will spread too much in the oven, and you will lose those beautiful edges. I usually take my butter out of the fridge about an hour before I start baking. This ensures the texture is perfect for whipping into a light, fluffy cloud that traps air for a crisp bite.
Step-by-Step Mixing Instructions
Starting your butter cookies journey begins with creaming the butter and sugar together in a large bowl. You want to beat them until the mixture looks pale and feels very smooth. Next, stir in your vanilla extract and any other flavorings you might like, such as almond or lemon zest. Slowly add your flour while mixing on a low speed so you do not make a mess. It is very important not to overmix the dough once the flour is in. Overmixing creates gluten, which can make your treats tough instead of crumbly. Stop as soon as the flour disappears into the golden dough.
Chilling the Dough for Better Shapes
If you want your butter cookies to look like they came from a professional bakery, you must chill the dough. After mixing, wrap the dough in plastic wrap and let it rest in the fridge for at least thirty minutes. This step allows the flour to fully hydrate and firms up the butter again. When the butter is cold when it hits the hot oven, it creates a steam lift that makes the cookies light. Chilling also prevents the dough from sticking to your rolling pin or cookie cutters. It is a small step that makes a massive difference in the final look of your bakes.
How to Pipe Beautiful Butter Cookies
Many people prefer the look of “spritz” style butter cookies which are squeezed through a piping bag with a star tip. To do this successfully, your dough needs to be soft enough to squeeze but firm enough to hold its ridges. If you find it is too hard to pipe, let it sit on the counter for five minutes to soften slightly. Use a steady pressure and move the bag in a circular motion to create pretty rosettes. These ridges will get slightly toasted and extra crunchy in the oven, which provides a wonderful contrast to the soft center. It is a fun way to get creative with shapes.
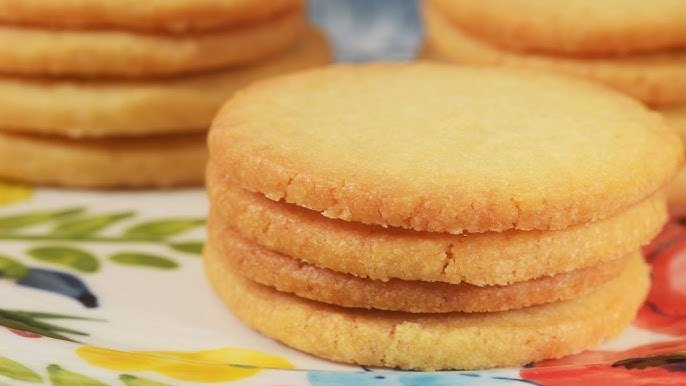
Perfect Baking Times and Temperatures
Baking your butter cookies at the right temperature is the key to getting that signature golden edge. I recommend setting your oven to 350°F (175°C) and lining your baking sheets with parchment paper. This prevents sticking and ensures the bottoms do not get too dark. Most batches will take between 10 to 12 minutes to bake completely. You are looking for a very pale gold color on top with just a hint of brown around the very bottom edges. If they look dark brown, they might taste a bit bitter, so keep a close eye on them during the last few minutes.
Fun Ways to Decorate Your Treats
While plain butter cookies are delicious, adding a bit of flair can make them feel extra special for holidays. You can dip half of each cooled cookie into melted dark or white chocolate for a fancy look. Adding colorful sprinkles or a dusting of powdered sugar is an easy way to involve kids in the process. Some bakers like to place a small piece of candied cherry or a whole almond in the center before baking. You could even sandwich two cookies together with a layer of raspberry jam or buttercream frosting. The possibilities for customization are truly endless with such a simple base recipe.
Storing Your Cookies to Keep Them Fresh
To maintain the crispy texture of your butter cookies, you must store them correctly once they have cooled completely. Never put warm cookies in a container, as the steam will make them soft and soggy. Place them in an airtight tin or glass jar at room temperature. They will usually stay fresh and delicious for up to one week. If you want to keep them longer, these cookies actually freeze very well. You can freeze the baked cookies for up to three months. Just thaw them at room temperature for an hour before you plan to serve them to guests.
Troubleshooting Common Baking Mistakes
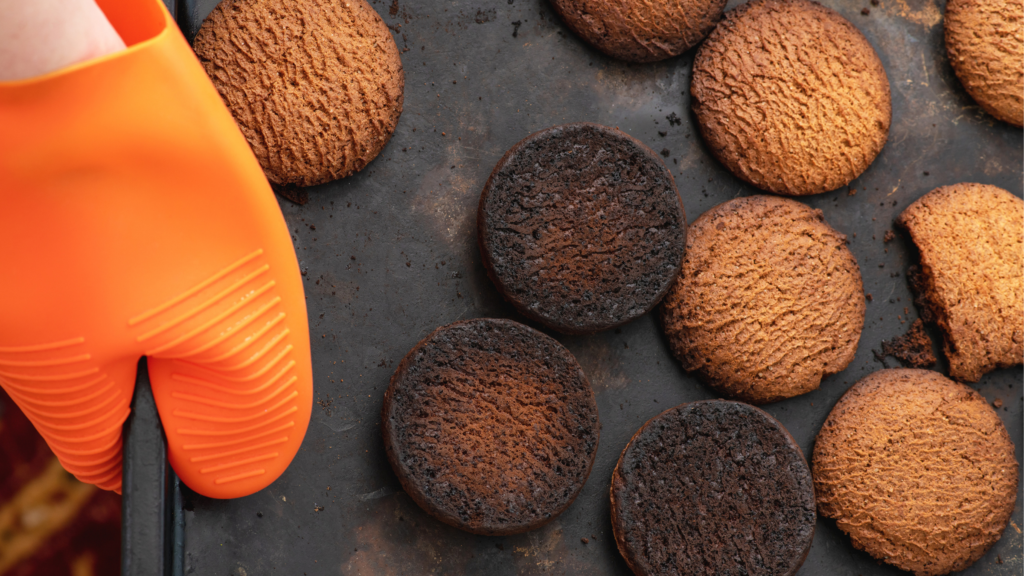
Sometimes butter cookies don’t come out quite right, but don’t worry! If your cookies are too hard, you likely used too much flour or overbaked them. If they spread into one big giant pancake, your butter was probably too melted or you forgot to chill the dough. Another common issue is cookies sticking to the pan, which is why parchment paper is a lifesaver. If they taste bland, try adding a tiny bit more salt or a higher quality vanilla bean paste next time. Learning these small tips will help you become a master baker in no time at all.
Detailed Comparison Table
| Feature | Spritz Butter Cookies | Shortbread Cookies | Danish Butter Cookies |
| Texture | Light and Airy | Dense and Crumbly | Very Crisp and Buttery |
| Shape | Piped Rosettes/Stars | Rectangular Bars | Rounds or Pretzels |
| Sugar Type | Granulated or Powdered | Granulated | Granulated |
| Best For | Holiday Platters | Tea Time | Gift Tins |
Frequently Asked Questions
1. Can I use salted butter for these cookies?
Yes, you can use salted butter, but you should skip the extra pinch of salt mentioned in the recipe. Unsalted butter is usually preferred because it allows you to control the exact flavor.
2. Why did my cookies lose their shape in the oven?
This usually happens if the dough is too warm. Make sure to chill your dough for at least 30 minutes before baking to help the butter cookies stay sharp and pretty.
3. Can I make this dough in advance?
Absolutely! You can keep the raw dough in the fridge for up to 3 days or in the freezer for a month. Just make sure it is wrapped tightly so it doesn’t pick up fridge smells.
4. What is the best flour to use?
All-purpose flour is the standard choice. It provides enough structure to hold the shape while keeping the texture tender. Do not use bread flour, as it will make them too chewy.
5. How do I know when they are done?
Look for the edges to turn a very light golden brown. The centers should still look pale and set. They will firm up more as they cool on the baking sheet.
6. Can I add different flavors?
Yes! You can add lemon zest, orange oil, almond extract, or even finely chopped nuts. The base dough for butter cookies is very forgiving and handles new flavors well.
Conclusion
Baking a batch of homemade butter cookies is a rewarding experience that brings joy to everyone who tries them. By using high-quality ingredients and following simple steps like chilling the dough, you can create a snack that is far better than anything bought at a store. These cookies are a testament to the fact that you don’t need complex recipes to make something truly delicious. Whether you are baking for a holiday or just to fill your cookie jar, these treats are sure to be a huge hit. Now that you have all the tips and tricks, it is time to preheat your oven and start baking!